
Welcome to chapter 3! In this chapter, we will create the pieces that will make up your dungeon! We will discuss two ways to make your dungeon pieces. First with the use of a voxel editor, but you can also make dungeons completely in the metaforge.
Time to create the puzzle pieces of your dungeon. Its easier to do this in a voxel-editor, but it is not completely impossible in the metaforge editor.
Here are some templates to start from:
- download qbcl file containing matrixes for lairs/dungeons + plug & socket helpers. (Qubicle)
- download qb file containing a model for a lair. (any editor)
- download qb file containing a model for a dungeon. (high dungeon / low dungeon ) (any editor)
- download qb file containing a model for a shadow dungeon. (any editor)
Size limitsTop ^
Whether you are making a dungeon or a lair, your type of dungeon has size limits. This also directly limits the pieces to those exact limits:
- Dungeons are limited to 125x125x125 (WxHxD)
- Lairs are limited to 39x90x39 (WxHxD)
The individual pieces and all pieces assembled cannot exceed these dimensions.
In the previous chapter, we covered general layouts. It is useful to make a mock-up model of your expected lair or dungeon. That way you will know for sure that your model will fit in.
Let's use an example. First, I make a rough layout model of my lair. It has Yellow entrance\gameplay area, then one more Red gameplay area and finally a Blue boss room. I want to work on the Entrance area first. So next I copy yellow rectangle and shape it the way I want. The last step is adding details to it.
Repeat the process for every room, and don't forget about variations!
Some voxel editors have advanced functions like Gradient or Noise or auto coloring. It is ok to use gradient in limited amounts, but using Noise is usually a bad idea. The art style of Trove is pretty simplistic and hand-colored creations fit it the best.
Material mapsTop ^
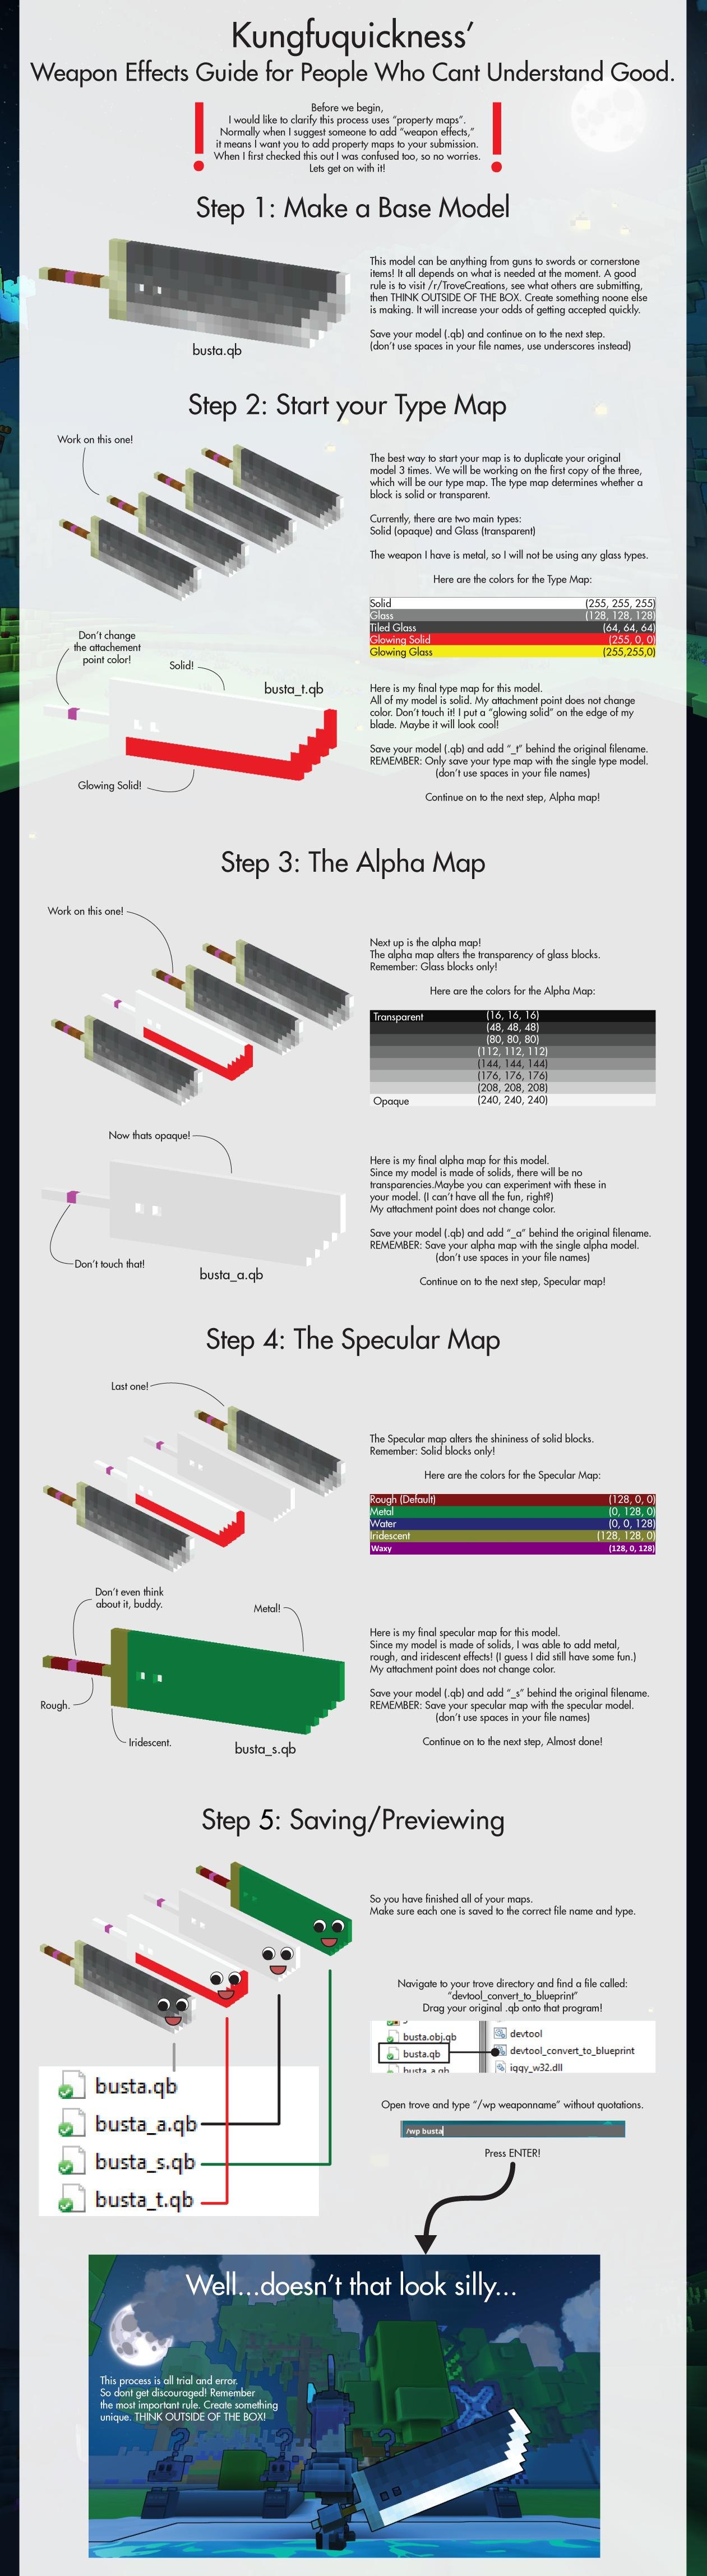
Material Maps are used to add special effect to voxels. Here you can find a visual Material Map guide made by Kungfuquickness on a sword, but dungeon rooms work exactly the same way.
In Trove there are few types of Material Maps:
Type - saved as name_t.qb
| Used as | Color | RGB | Hex |
|---|---|---|---|
| Solid | 255, 255, 255 | FFFFFF | |
| Glowing Solid | 255, 0, 0 | FF0000 | |
| Glass | 128, 128, 128 | 808080 | |
| Tiled Glass | 64, 64, 64 | 404040 | |
| Glowing Glass | 255, 255, 0 | FFFF00 |
Alpha - saved as name_a.qb
| Used as | Color | RGB | Hex |
|---|---|---|---|
| Opaque | 240, 240, 240 | F0F0F0 | |
| 208, 208, 208 | D0D0D0 | ||
| 176, 176, 176 | B0B0B0 | ||
| 144, 144, 144 | 909090 | ||
| 112, 112, 112 | 707070 | ||
| 80, 80, 80 | 505050 | ||
| 48, 48, 48 | 303030 | ||
| Transparent | 16, 16, 16 | 101010 |
Specular - saved as name_s.qb
| Used as | Color | RGB | Hex |
|---|---|---|---|
| Rough (default) | 128, 0, 0 | 800000 | |
| Metal | 0, 128, 0 | 008000 | |
| Water (wet) | 0, 0, 128 | 000080 | |
| Iridescent | 128, 128, 0 | 808000 | |
| Waxy | 128, 0, 128 | 800080 | |
| Silk (glare) | 0, 128, 128 | 008080 |
Alpha map can only be used on voxels that were mapped Glass, Glowing Glass or Tiled Glass on Type map.
No other maps can overlap each other. Meaning, if a voxel is mapped Glowing Solid on type map, it can not be mapped on Alpha map and can not be anything but Rough on Specular map. Overlapping maps result in the game-engine displaying only one of them and continuously trying to display the other one, which causes extra stress on it.
All colors for material maps have to be EXACTLY the same values are listed above. Even a slight difference in color would not work. For example: 255, 0, 0 is correct, 255, 1, 0 is not.
That said, I want my lair to have some glass, some glowing bits, and a metal casing. So I create copies of my complete rooms for each material map I want there and color glowing and glowing glass bits on Type map, set transparency to glass bits on Alpha map and set metal color to metal bits on Specular.
Exporting as QB and converting to .BlueprintTop ^
Once you are done making rooms of your dungeon, it is time to export them. Troves dev tool can only handle .qb (and .blueprint) types of voxel files so make sure you are saving as or exporting your files as .qb. All voxel editor applications can do that one way or another.
It helps to name your dungeon parts within the editor, so you know for sure which is which once its exported.
If a room of your dungeon has Material Maps, name them accordingly. This lair entrance has type mapping, alpha mapping, and specular mapping:

Note that Fake Air roof can be of any color, in .qb files its only created as placeholder. Once you convert your .qb to .blueprint and open it in Metaforge you will use /floodfill command to fill that with Placeholder (Fake Air) blocks.
Tip: make sure there are no spaces in names of your files, that might cause issues.
Qb files cannot be used by Trove directly and need to be converted to .blueprint first. For that, locate your Trove/Live folder, it will contain devtool_dungeon_QB_to_blueprint.bat. Drag your main .qb file onto it (NOT material maps!). That will create a .blueprint file in the same folder your .qb files are, and also a duplicate .blueprint in Trove/Live/Blueprints.

During the next steps, you will need to work on those .blueprint files in Metaforge. To get in there log in Trove, type /mf in chat, confirm. Once in metaforge, drag in your .blueprint file, one at a time. You can also use a /load command, but that will require you to type in a whole path of your blueprint. Don't forget to /save if you make changes.
Tip: it's good to keep backups of your blueprints, not all actions can be undone.

devtool_dungeon_blueprint_to_QB.bat is used to convert blueprints to QB files. This is useful if you want, for example, to add an actual tree from the biome to your dungeon. For that you would need to extract game files first, this guide has good instructions on how to do that.
Next, you create a subfolder named qbexport in your Trove/Live directory. That is where qbs from converted blueprints will end up. Find a blueprint you want to convert in your Trove/Live/extracted folder, let's take e_neonsub_tree_01.blueprint for example. Drag that onto devtool_dungeon_blueprint_to_QB.bat and it will create 4 files in Trove/Live/qbexport:
 One main qb, one qb per material map and _entities.blueprint. Note that even if the material map on that exact model is not used, it will still be automatically created as a file. For example - there is no glass on that tree, but the alpha map is created. _entities.blueprint contains information about decorations\liquids\special blocks placed on the main blueprint. All those items on qb files will be displayed as solid blocks of bright cyan color ( hex #00FFFF or RGB 0,255,255).
Note that converting to blueprint automatically places an Attachment point ( hex #FF00FF or RGB 255,0,255) in a blueprint, so converting back and forth can result in buggy blueprints.
Creating parts in metaforgeTop ^
You can create dungeons directly in Metaforge. That will skip QBs and converting completely.
Load in Metaforge and start placing blocks. Once you are done, type /save example_name , that command will save your creation as example_name.blueprint in your Trove/Live folder.
However, there are few downsides to this method:
- only colors and blocks that are available in-game can be used
- no special tools like selection or moving blocks are available, only default build mode (aside from free flight and unlimited blocks)
- it can be hard to overview full layout and the way rooms are attached to each other
Even if you are an established builder in Trove, we strongly suggest you try using some Voxel editors for dungeon creating. They really do speed up the process and offer various useful tools that save time and make the creative process more pleasant.
<- Chapter 2 | Intro and Table of Contents | Chapter 4 ->
Page Change Log
- 2018-09-25: Written
- 2019-03-08: Published


